


Review: HEROINE MAKE Smooth Liquid Eyeliner
 |
| Packaging is simple, nothing too fancy. |

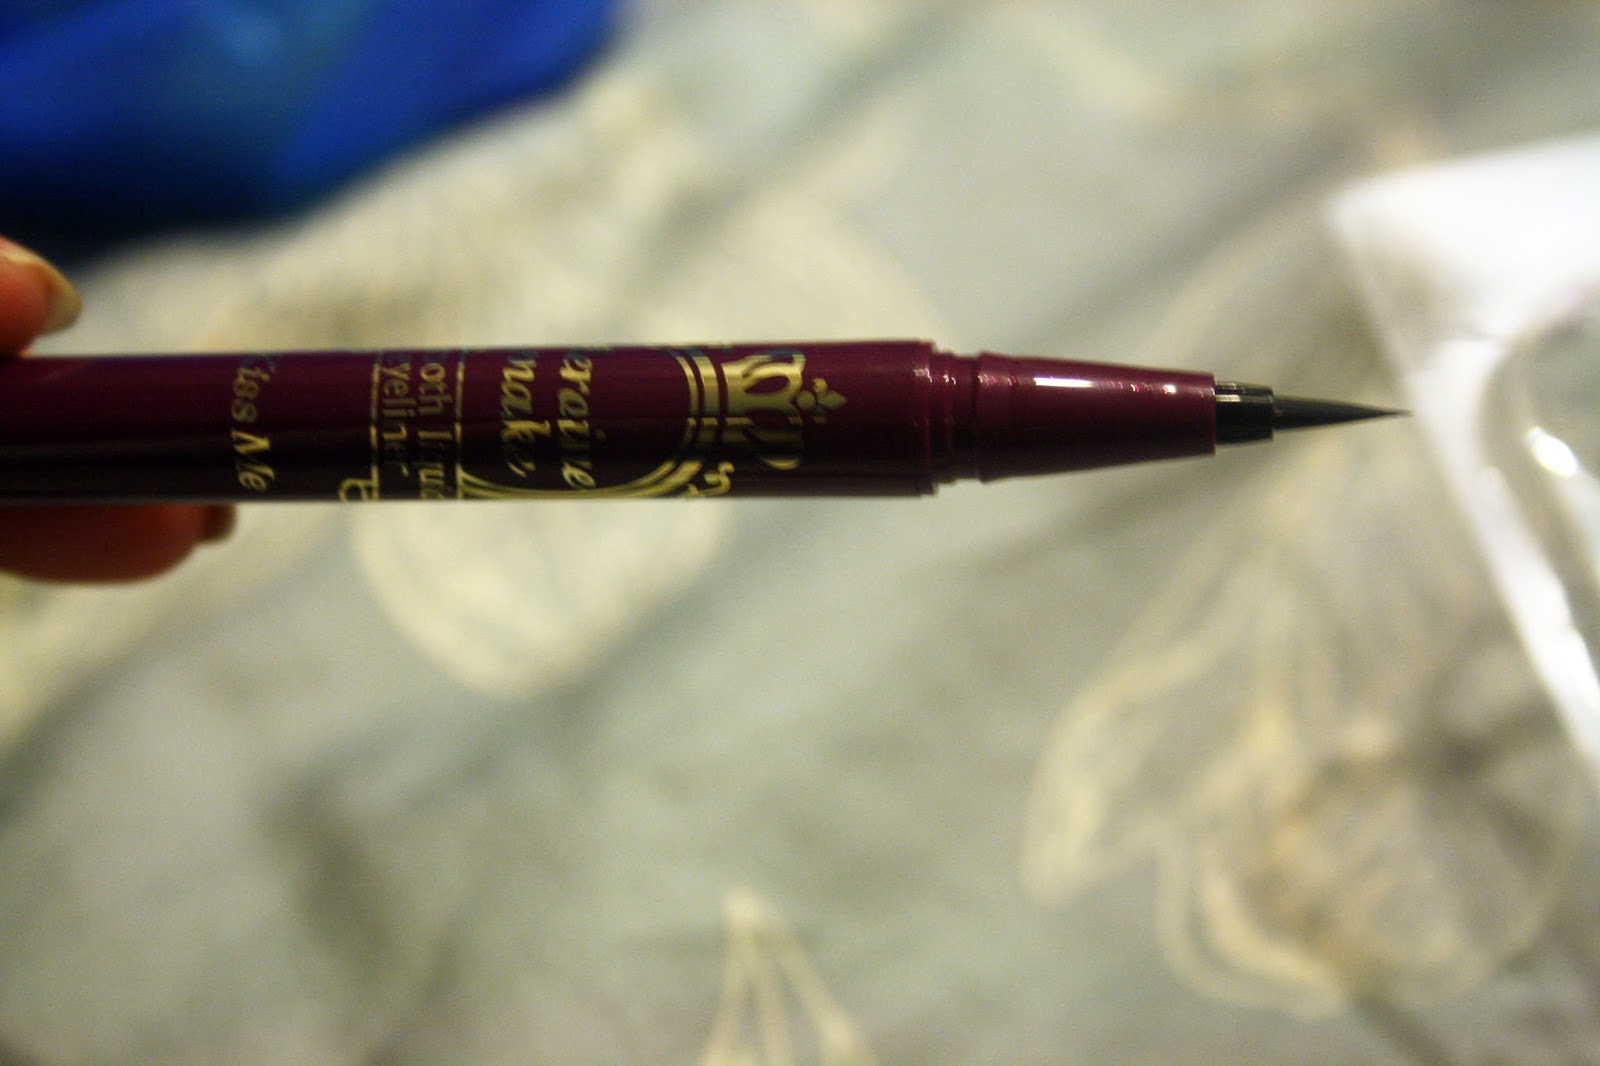 |
| Super-Fine Tip!! |
 |
| Only on stroke, top was a bit messed up. Second one was a fine stroke, and Third was swatched with a bit more pressure to show how thick you can draw your lines. |
 |
| 8:39 AM, Morning make-up with eyeliner. |
 |
| 8:39 AM, Morning make-up with eyeliner. |
 |
| 8:39 AM, Morning make-up with eyeliner. |
Over 12 Hours Later...
 |
| 9:19 PM, What my make-up looks like after. Eyeliner still dark, and I purposely did not retouch it through-out the day. I had school that day.. so lots of yawning being done! |

| |||

 |
| 9:19 PM, What my make-up looks like after. |
 |
| 9:19 PM, What my make-up looks like after. Eyeliner still dark! |
Link to Heroine Make Smooth Liquid eyeliner from Sasa:
http://www.sasa.com/SasaWeb/eng/product/viewProductDetail.jspa?itemno=105708104003
DESCRIPTION FROM SASA:
Kiss Me Heroine Make Smooth Liquid Eyeliner has a new and strong waterproof function, which can effectively act against tears, water, sweat or sebum on your face. The function is very long-lasting and has a precise contouring. The 0.1mm extreme fine point allows you draw precise and beautiful eyeliners every single time.
It is an excellent all-around product in which the incredibly fine point can help you freely sketch an inner eyeliner, where color is deep and black, brilliant and bright. The eye power can be immediately doubled. Kiss Me Smooth Liquid Eyeliner dries very quickly, so it can help you make a perfect look no matter how busy your mornings are. It is superiorly waterproof, anti-tear, anti-sweat, sebum resistant and totally waterproof. The color is long-lasting and is easy to use. Everyone can easily draw perfect eyeliner.
PROS:
- Super fine tip
- It's in a pen form (my favourite kind)
- Brush Tip applicator not felt!
- Stays on through-out the day
- Pigmented
- Does not smudge when I tear (especially after I yawn)
- Doesn't transfer down to my lower lash-line
- Convenient and travel-friendly
CONS:
- Pricier than the regular drugstore eyeliner (BUT SO WORTH IT)
- Might be hard to find in stores since it is a Japanese brand
- Is not actually waterproof
OVERALL RATING OUT OF 5:
♥♥♥♥♥

SUPER RECOMMEND THIS EYELINER
if you can get your hands on it that is. I got mine for about $22 CAD at an Asian store in my mall. I believe it's about the same price if I had bought it off SASA if I included shipping and tax. Despite its pricey-ness, the benefits outweigh the costs in my opinion. I have tried a ton of drugstore pen liquid-eyeliners, including Maybelline's Master Precise, NYX Skinny Felt Pen, L'oreal's Infallible 12HR Liquid Pen, Revlon's Colorstay, Physician's Formula Eyebooster and Topshop's Liquid Pen Line. I realized that felt tip pens (except for physician's formula, but it wasn't very pigmented or long-lasting in my opinion) dry out a lot quicker than brush tip pens, and also do not provide very great precision because of the felt tip.
I was almost about to buy the Kat Von D's Tattoo Eyeliner, but I opted for a Japanese one just because I felt like the more expensive Asian make-up products really do perform very well, even some of the drugstore brands they carry. Although I could just get a regular liquid liner, I PREFER PEN LIQUID LINERS because of convenience and ease!
On the subject that it is not actually waterproof as it claims to be, it does however hold up against tears (I know because I always tear up after I yawn), sebum, and sweat. I've always had a problem with all of my eyeliners prior to Kiss Me, smudging and transferring on to my lower lash-line.. so I end up looking as if I have major eye-bags, not enough sleep, or just looking like a panda (angry). But as for water with direct contact, it does fade a bit, and if you just rub it a bit it will smudge. Which I do not mind too much, it just makes it easier to remove after in the shower. It comes off with warm water and light rubbing. I doubt it will come off or smudge a lot when it rains.
Labels: Black, Eyeliner, Eyes, Heroine, Japanese, Kiss Me, Liquid, Make, Make-up, Pen, Reviews, Smooth
Review: Neo Dali Brown Circle Lens


Hey guys, so this is a very very veryyy brief review of the lenses, so no comparison photos with other lenses and lighting, and I forgot to take pictures without lenses... >___< if you guys really want them, just request in the comment box. By the way, all the photos are in indoor lighting/low lighting.
BACKGROUND INFO:
I have been wearing circle lenses for almost 4 years now and it is mostly for my very bad vision (-8.50 O_O), I typically go for the natural lenses and I've never tried any other colours of circle lenses other than grey and brown. I have tried GEO, NEO, and EOS Lenses. I prefer subtle enlargement or none. My eyes are super sensitive and dry.. I shouldn't be wearing lenses, but I insist on it!! So comfort for me is a must!! and the higher the water content, the better.
I have been wearing circle lenses for almost 4 years now and it is mostly for my very bad vision (-8.50 O_O), I typically go for the natural lenses and I've never tried any other colours of circle lenses other than grey and brown. I have tried GEO, NEO, and EOS Lenses. I prefer subtle enlargement or none. My eyes are super sensitive and dry.. I shouldn't be wearing lenses, but I insist on it!! So comfort for me is a must!! and the higher the water content, the better.
http://www.honeycolor.com/neo-dali-circle-brown.html
DESCRIPTION FROM HONEYCOLOR SITE:
Usage Modality: One Year Disposable
BC: 8.6 mm
DIA: 14.2 mm
Water content: 45%
DESIGN:
- Super Duper Natural
- Has a bit of a darker rim of about 1mm surrounding it and diffuses into brown a total rim of roughly about 2-3 mm
- From far away it looks like normal eyes
- Up close looks natural as well, unless you are like... 5 cm away from my face can you actually tell I'm wearing circle lenses
- Subtle gradient effect
ENLARGEMENT:
- This is definitely 14.2 mm
- The difference between my regular eyes (sorry no pics XD) is really minimal, probably like .. 1 mm difference
COMFORT:
- Super comfortable
- Feels like nothing when you first put it on
- I can wear it from 8 AM - 6-7PM (10 ish hours), after that it will be a bit irritating
- of course take it out as soon as you can to protect your eyes!!
OVERALL RATING OUT OF 5:
♥♥♥♥½♡
I REALLY LIKE IT, and RECOMMEND IT! if you prefer the natural look
The only reason I don't give it a perfect 5 is that I wish it gave me a teeny weeny bit more of enlargement, even just a millimeter more, my natural eyes are almost the same size as the lens, it only really defines the outer rim making it appear a bit larger. Again, this is really natural, I have tried the GEO BC-102, and although I really like those ones, these ones are way more comfortable.
THE SITE: ♥♥♥♥♥
THE SITE: ♥♥♥♥♥
I ordered these from honeycolor.com with skeptism. Their pricing is really reasonable, but shipping costs 5$USD to Vancouver, Canada. And Standard shipping costs 5$USD per item and 1$USD for any additional items, but I guess they charged me 6$ because the free contact lens case that came with it counted as another item =_=.. so much for it being free. Standard shipping was said to be approximately 14 working days.
I originally ordered these in -9.00, but they were out of stock, so they contacted me the following day to let me know. I ordered on October 8, 2012, and received a reply telling me they didn't have it in stock on October 9, 2012. I then replied to them that I would just go with -8.50, and they confirmed with me a couple hours afterwards. The package was shipped out on the 12th, so it was a total of 3 processing days just like how it said on the site, and my order arrived on the 18th of October.
Shipping was less than a week!! And they were really prompt and clear on contacting through email. I'm really glad, they have fast service, and moderately priced for circle lenses!! I will definitely order from them again, unless I'm looking for different lenses. Honeycolor offers a wide range of lenses, such as NEO, EOS, GEO, FLORA, DOLLY+ and a few others.
BTW: WHAT ARE YOUR THOUGHTS ON INSTAGRAM?
Should I make one for daily photos of my life and outfits, and buys? I'm not really an instagram user, but if you guys want it I will. It'll be easier for me to update through that rather than here.
| Description | Unit price | Qty | Amount |
| Neo Dali Brown Item# N-013 | $19.14 USD | 1 | $19.14 USD |
| FREE LENS CASE - Animal Contact Lens Q Case Item# Qcase | $0.00 USD | 1 | $0.00 USD |
| Shipping and Handling (Please select - - Standard Shipping (Reg'd Air Mail)) | $6.00 USD | 1 | $6.00 USD |
|
Labels: 14.2, Brown, Circle, Color, Dali, Eyes, Honey, Honeycolor, Lens, NEO, Reviews
Back from the Dead... (Rambling)
Hey guys..CAUTION: YOU GUYS ARE ABOUT TO READ A VERY BORING POST
but, uber happy if you guys actually read it ^^~
Surprisingly, I'm not dead haha.. I haven't posted since March O_O I think I maybe one of the worst bloggers out there :X. Okay, so on let's just move on to my rambling. So many things have happened, and I'm super busy.. with school and work. During the time I haven't posted.. I've had 2 jobs LOL.. I worked at J. Crew, and now I work at Topshop!! I just got the job 3 weeks ago, and my first day was on the floor today, second day of the store opening, and my my my.. was it SUPER HECTIC. (I live in Vancouver, BC. for all of those of you who are curious.. J. Crew opened in April and Topshop opened this month!) But I love the work environment, super energetic! It's like a workout just going to work hahaha..
Other things have happened as well. I went to my cousin's wedding and worked in my city's amusement park as a side gig. So... after the wedding, I decided to lose weight just based on the pictures I saw.. I had to stop lying to myself, and really get to it. I originally weighed 143 lbs... O___O And that is why I don't have any outfits of the day posts LMAOO.. As of today, I weigh 125 lbs!! (Lost 18 lbs over the summer) and I'm SUPER ECSTATIC. I feel healthier, and I have more energy during the day. I AM NOT STARVING MYSELF Y'ALL.. And I even cut my hair shoulder length and dyed it black :P I never would have never done this before. (Believed that short hair made me look fat)
Aside from my little life story...
I've decided to commit a little bit more to blog posting and reviews, and maybe a few tutorials here and there!! I cannot promise to blog every single day, but I will try at least once every 2 weeks.
I've recently ordered circle lenses from honeycolor.com, so a post will hopefully be up in the next 3-4 days about the contacts I got. It'll be a review of the site and the lens! (I got the NEO Dali Brown Lens, 14.2 dia.) It's actually the first time I've ordered circle lenses online :O
And during my hiatus, I've tried a lot of products (Korean and American), so I'll try to post up some reviews for that as well.
BTW: WHAT SONG IS ON YOUR MIND ATM?
Mine is Every Night by EXID, I seriously can't get enough of it. It reminds me of the old k-pop :)
Bye for now!!
Ttalgi~
Review: Skinfood Lip/Cheek Tint, Red Orange Jelly BB Cream & Naked 2 Palette


Link to the Lip/Cheek Tint:
http://eng.theskinfood.com/Product/product_detail.asp?cat=1|5|37|0&productid=3197
DESCRIPTION FROM SKINFOOD SITE:
a multi-purpose product that makes your lips and cheeks moist and lustrous with fresh fruit colors.
* To Use - For lips: Using your finger or a lip brush, apply it on your lips. - For cheek: Using your finger or sponge, apply it evenly on the part of your cheek that protrudes a bit when you smile.
PROS:
- The color swatches exactly like what it looks like in the pan
- Pigmentation is very good, the swatch I did was only from swiping it once
- One swipe is enough for one cheek, another for the other :P
- The color is fairly universally complimenting to most skin tones, even dark skin tones since it is bright enough and pigmented enough to show up
- The packaging is very cute and vintage-y looking
- The size of the product makes it very travel-friendly!
CONS:
- The color only lasts for a couple of hours, so then I'd have to reapply it
- kind of defeats the purpose of it being a "tint"
- You have to apply it with your fingers, or very carefully with a make up sponge
- It attracts dust/lint like crazy!! So you can't use a brush to apply it, and you'd have to use a very very clean sponge.
OVERALL RATING OUT OF 5:
♥♥♥♥½♡
I REALLY LIKE IT, and RECOMMEND IT!
Although when I first got it, I was surprised the consistency was creamy, it almost felt like a lip gloss you get in a tin, but because it's a creamy consistency, it does not create any dry patches on my face, and my lips stay hydrated. I usually like applying my make up with brushes, so it kind of bums me out that I have to stick my finger in it(I really hate products like that), but the results I get overpower the hates I have for it. The color is very build-able, but when you first apply one swipe on your lips/cheeks, it's a very natural and flattering color. I actually like the color, and it does not look too much when you wear it on your cheeks and lips at the same time.
I actually ordered this from a store online on Facebook, I'm not sure if they do shipping because they work around my area (Vancouver, BC). But here's the link if you're interested!!
I purchased this for $11CAD, a bit pricey for this puny thing, but I like it enough to justify the price!
There's also 5 other colors available as well.


Link to Red Orange BB Cream:
http://eng.theskinfood.com/Product/product_detail.asp?cat=2|145|204|0&productid=3927
DESCRIPTION FROM SKINFOOD SITE:
This flexible jelly pudding BB cream contains moisture-rich revitalizing ingredients from orange to keep your skin ultra moisturized and to create a hydrated and jelly-like resilient skin with a smooth finish.
* To Use
Put a moderate amount of cream on your hand and tap around on your skin. Use a modicum amount for each use because it contains lots of hydration, and then make sure to put the cap back on not to lose hydration.
PROS:
- Has medium-high coverage
- It's build-able, and you do not need very much to have even coverage
- Product will probably last for a while...
- Very hydrating, does not make my skin look flaky at all
- Smells so goooood, literally like red oranges yummm
- Super easy to spread since it has a jelly-like consistency
- It has no grey undertones like other BB Creams
- Contains SPF20 PA++, but it doesn't create a white cast like most spf, it does brighten your skin very naturally though
- Matte finish
CONS:
- I can't say anything for oil control since my skin is combination more on the drier side
- Personally, I like a dewy finish, so I'd have to use a make up base with a dewy finish under
- I usually don't apply primer, which I should though, since I'm lazy... more work TT^TT
- It's in a jar, so I hate having to stick in my finger or brush to pick up product
- I actually went to Sephora and took some of their little paddles they use to get samples for skin care LOL shhh*~
- Really easy for you to apply too much if you're not careful
OVERALL RATING OUT OF 5:
♥♥♥♥♡
RECOMMEND TO THOSE WHO WANT A MATTE EVEN FINISH!
I'm currently using it everyday, it's a very natural foundation, but because I like having a dewy finish, I have to apply more face make up than I need to. I'm only using it everyday so I could just finish it up haha. This BB Cream is very photo friendly though because of it's even coverage, and matte finish despite it has SPF 20 in it. Which is goood, the SPF does not create any ghostly white cast on my face when I take pictures which I like. It comes in only 2 shades [no.1 Light Beige (Which I use), and no.2 Natural Beige] like most BB Creams.
What led me to try this BB Cream, probably like many others, was because of YouTube Guru, Oiseau88, this is apparently her favorite BB Cream. Swatches can be found in a lot of her videos:
I also heard that they may be discontinuing their Red Orange Line as well, so I suggest you pick this BB Cream up if it sounds like it maybe the BB Cream for you ^o^~
I also ordered this from the store online on Facebook, I'm not sure if they do shipping because they work around my area (Vancouver, BC). But here's the link if you're interested!!
I purchased this for $19CAD, the price is fair for a BB Cream in my opinion :)


DESCRIPTION FROM SEPHORA:
Naked2
What it is:
The most anticipated sequel of the decade, Naked2 features a dozen pigment-rich taupe and gray-beige neutrals, plus five exclusive, new shades.
What it does:
The follow up to the original bestselling Naked palette, this stunning second edition proves that neutral is anything but boring. Showcasing a dozen completely different shades than the first bronze-based collection, it includes a stunning range from pale and deep, to matte and sparkly. You'll achieve a host of new neutral looks, smoky dramatic eyes, and everything in between. The palette also includes a travel-size Lip Junkie Lipgloss in Naked and a double-ended, cruelty-free Good Karma Shadow/Crease Brush (available only in this palette).
This set contains:
- 12 x 0.05 oz Eyeshadows in Foxy (cream bisque with matte finish), Half Baked (golden-bronze with shimmering finish), Booty Call (shimmering cork), Chopper (copper shimmer with silver microglitter), Tease (creamy pale brown with matte finish), Snake Bite (dark bronze shimmer with metallic base), Suspect (pale golden beige with shimmering finish), Pistol (light gray-brown with shimmering finish), Verve (oyster with shimmering finish), YDK (cool bronze shimmer with metallic base), Busted (deep brown with shimmering finish), Blackout (blackest black with matte finish)
- Good Karma Shadow/Crease Brush
- 0.11 oz Lip Junkie Lipgloss in Naked (pinky neutral)
PROS:
- The colors are super wearable for just about anyone
- Pigmentation is super good, and it applies smoothly
- The brush that it comes with works well if you want to create naturally blended looks
- Probably the reason why a lot of people find the brush useless, because it doesn't pick it up as well as it should be
- but I like the naturally blended look so I don't find it a problem at all (I don't usually look strong harsh shadow on my eyes)
- The lip-gloss it comes with is minty and super wear-able as well (Sorry no picture)
- The packaging is sturdy and travel-friendly
- Good value for what you pay for!! ($60CAD and you get 12 eyeshadows, a double-ended blush, and mini lip-gloss)
- The mirror is big, so you wouldn't need another mirror if you didn't have one when you travel
- Contains matte colors, huge plus!! Usually Urban Decay really go all out on the shimmery/metallic colors
- The black shadow is superrr pigmented, and could probably be sufficient as eye-liner
- Can create endless types of looks with this one palette
I don't have any cons really for this palette, except for maybe some of the colours I don't really touch, but I can't complain since it is a palette made for mass consumers not for me personally :P I don't own the first Naked palette, but I did see it and decided to opt for the 2nd Palette instead of the first since, the colours in the first palette are more to the warm browns and bronzes instead. From what I see, the Naked 2 palette is a lot more cool toned, with also like 2-3 warm colours as well. Which I like, I don't really like warm shadows too much (especially when I had lighter hair, thought it made me look to orange hahahaha!!)
OVERALL RATING OUT OF 5:
♥♥♥♥♥
I didn't do any swatches because I'm lazy and also because it's so popular there are bound to be swatches on other blogs and YouTube Videos :P (I blame myself!!)
And that's all for today! Sorry for the huge break, I'm still really busy with school and work, but I will try to put up and finish the StyleNanda review for this weekend!
Bye for now!!
Ttalgi~
Labels: BB Cream, Cheek, Lips, Naked 2, Orange, Red, Reviews, Skinfood, Urban Decay
Update: Upcoming Haul & Liese Hair Dye
LIESE BUBBLE HAIR DYE:On my last blog post I did a pretty thorough (Or I would like to think I did hahaha) review and I as a final conclusion I gave it a 4/5 rating. It's now been a week, and I find that the colour faded about 1 shade down, for me that meant, that it was getting lighter since the colour before I dyed it was very light. I don't have any pictures of when it faded, since I dyed my hair again (YES I KNOW SO BAD >________< but I really wanted the lightness gone), but I could tell you that it my whole head was a tad bit lighter than when I first dyed it.
SO BECAUSE OF THE RESULT OF ONLY 7 DAYS LATER: I revoke my rating of it being 4/5 to a 3.5/5.
♥♥♥½♡
I RECOMMEND THIS DYE TO THOSE WHO ARE ONLY LOOKING FOR A SUBTLE CHANGE IN HAIR COLOR, or you want to achieve a shade that is 1 level subdued from what the picture on the box is.
On a sidenote:
I re-dyed only about the top of my head (4 inches from my roots) using Redken Color Fusion Dye in Natural 4NN. It's a professional hair dye box (I got this from my cousin who's a hairstylist, so I had to mix my own dye with peroxide level 10, and I used level 10 cause I wanted to darken my hair colour) and I only left it in for about 15-18 minutes just cause I only wanted to get a tad bit darker. Turned out awesome, the bottom half of my hair is a bit lighter because of the Liese Dye, but I actually really like the effect.
UPCOMING HAUL:
1)
As you guys might know (or not), I've ordered quite a few products from this South Korean site called "StyleNanda". I didn't order any clothes from them, just because I didn't see anything particular that I like or stood out to me (There are certainly some really nice pieces on the site, but nothing I feel that I can't find around where I live). So all that things from StyleNanda will be only make-up related things.
The package has actually arrived, but I'm missing two things for some reason.. they wrote the wrong address on the second package of things and now they're sending it back to Korea =.= So it won't be most likely until another 2 weeks or so until I get the rest of my things from them. And I won't be putting up a blog post until I have everything together.
So far all I can say is: their shipping is actually quite fast, the first package came in 10 days! Impressiveeeeeee.... but it might take double that time to get my second package SIGH...
Here's a little preview of StyleNanda products I ordered:

Check out their site here: http://en.stylenanda.com/
2)
Along with my StyleNanda stuff, I'll also be showing you guys a collective haul of the things I got including, random stuffs from Daiso (Japanese 2$ Store), clothes and accessories from Zara, French Connection, The Bay Hudson's Company, Guess and h&m!
3)
I'll also be posting up a review on Skinfood's Red Orange BB Cream, and Skinfood's Fresh Fruit Lip & Cheek Tint~
*FOR THE HAUL, I'll just be using my crappy quality ipod camera. But for the review I WILL use a better quality camera... hopefully x_____x, I'm still trying to find my charger (fingers crossed)
Bye says Ttalgi~
Review: Liese/Prettia Bubble Hair Colour

DESCRIPTION FROM LIESE SITE:
Liese Bubble Hair Color is a new type of permanent hair color. Just apply foam on hair and massage. No more troublesome sectioning of hair! Foam reaches all over the head easily and you can achieve beautiful, evenly colored hair easily! With 17 shades available, choose your favorite colors from the Pink Brown series to Ash Brown series.
STORY BEHIND IT ALL:
First of all I want to talk about my hair before dying:
I've dyed my hair once in March 2011 professionally at a salon, and I've probably done about 3 times self roots touch ups, my hair colour was originally a mixture between a medium ash blonde and brown (I had this done at my cousin's salon, so she made a special colour for me and I did bleach it once to get the colour). Before that I did use a L'Oreal Box Dye, and a Nice and Easy hair dye as well. Overtime, due to my Asian-ness dark hair, it got brassy/coppery over time, so by the 3rd month it was an orangey brown. I would say I use hot tools on my hair about twice a week, and I almost never blow dry my hair when I get out of the shower (Air dry instead, just cause I'm lazy :P).
This is the first time I used Liese Hair Dye:
I was hesitating on either dying my hair again at a salon, but it was a bit pricey. And I didn't want to dye it myself since it would be messy and I can't get all the spots, I don't really trust other people other than pros with my hair ... (especially after trying those drug store dyes, the colour correction process for that was soooo long) I only decided to try this dye out because of the countless reviews I've researched.
PROS:
- Super easy to use, and quick too
- Not as damaging as regular dye since it's in a foam form
- The colour came out almost exactly as it said on the box
- Entertaining since it's all foamy!!
- Comes with hair lotion that smells super gooooood and leaves hair soft
- Good range of colours to choose from
CONS:
- Smell is realllllyyyy strong, stronger than most regular dyes
- Instructions are in Japanese
- Suggested time on the box does not get you the colour they depict on the box
- Stains clothes and some surfaces
PROCESS AND END LOOK:
My younger cousin actually dyed her hair with the Chiffon Beige colour, and she recommended me to leave it in my longer than intended since she didn't get the desired colour she wanted. In the box it says to leave it in no longer than 40 minutes, but I left it in for little over an hour and I managed to get the almost EXACT colour on the box. I AM NOT IN ANYWAY SAYING THAT YOU SHOULD DO THIS TOO, that is just my experience. It's probably bad to leave it in more than intended (obviously =_=), but I took that risk to achieve my hair colour. While waiting I did put a shower cap on top of my foamy hair just to make sure the colour really sunk into my hair, it doesn't say to do that on the box either, and I'm not too sure if it worked, but better to do it anyways right since there's no harm ^__^. Then I only rinsed my hair until the water ran clear, then I just used conditioner (no shampoo!) and blow dry-ed my hair.
After that, I did not wash my hair for 2 days.. It doesn't say to do that on the box either or the instructions provided on the Liese site, but I figured that my natural oils will help it stay put since that's how it works with most dyes.. and I'm happy to say that it did so far. (It's only been 3 days though hahaha) I only did this because I was scared the colour might fade since my hair was sooo light before.
I picked the colour Elegant Ash, and it's almost close to black, a reallly dark brown with an ashy undertone, in the sun my hair is still a little bit orangey, but not too much. That shouldn't be a problem if you dyed your hair light without bleaching it, I believe it's only orangey because I bleached it once..
I picked the colour Elegant Ash, and it's almost close to black, a reallly dark brown with an ashy undertone, in the sun my hair is still a little bit orangey, but not too much. That shouldn't be a problem if you dyed your hair light without bleaching it, I believe it's only orangey because I bleached it once..
OVERALL RATING OUT OF 5:
♥♥♥♥♡
I HIGHLY RECOMMEND THIS DYE!
If you're on a budget that is!
I bought this for $16.99 CAD (not including tax) at my local T&T Supermarket (Asian chain supermarket)
I really recommend this to majority of you guys since it is I believe aimed towards Asian women, concluding that it works and performs well on dark hair colours and for you Asian ladies, the colour choices are very complimenting..
LIESE BUBBLE HAIR DYE SITE ~ CLICK IT
BUBZBEAUTY DYES HER HAIR WITH LIESE ~ CLICK IT
I used Bubzbeauty's hair dying video as a ref for instructions on how to as well as the instructions on the Liese website.
And that's all!
Bye says Ttalgi~
Labels: Reviews
Everyday Natural Smokey Eye: Ulzzang Inspired
 Hey guys,
so this is the look I wore today, it's one of a few looks I often wear to school :) (Just to mention, if you click on the pictures, it zooms in!!)
This look is uljjang/ulzzang (짱) inspired look, and ulzzang means "best face" in Korean and the word is used both online and in real life. Basically, an ulzzang is someone who has a very attractive face, but most people use the term to describe people who have become popular for their looks.
Usually they're looks are really focused on perfect skin, blush, and eyeliner with very minimal eyeshadow. This look I'm sporting is a bit more elaborate than just eyeliner and mascara though.
Sorry, I don't have the best quality camera in the world, so the blush/colours are a bit washed out, but I don't use a lot that much, just for a hue of colour. And I want to mention that I use a fluffy blending brush for the eyeshadows because it gives a very natural application!
First of all, I want to mention that I am wearing the EOS Pure Brown Contacts, just the regular 14.0 diameter. (I might do a review in the future)

- A mixture of BB Moisture Cover in Natural Finish + Magic Premium High Intensive BB Cream in Natural Beige.
- I mix these two because I find that the BB Moisture Cover is a bit too yellow and the Magic BB Cream is a bit too pale, so I mix them. And I apply it with my elf studio powder brush.
- Fresh Umbrian Clay Absolute Concealer in Shade 2 for my under eyes.
- Contour the sides of my nose and the hollows of my cheek bones using a light hand with my Nars Laguna Bronzer.
- Apply blush on the apples of my cheeks using Nars G-Spot Multiple using just a regular blush brush.
- (probably after eye-make up) Lastly filled in my brows with Daiso Brand Eye Brow pencil in Dark Brown. I extended my brows slightly just so it could match the length of the winged eyeliner.
- I did that by aligning the side of my nose to the end of my winged eyeliner, and where it aligned on my eyebrows, I extended it till there.

For my eyes/lips:
- Applied Urban Decay (UD) Primer Potion all over my lids and let it set for a couple of seconds.
- With a fluffy blending brush, used UD's Suspect (Naked2, a satin light taupe) as an all over lid colour (keep it within your crease).
- Using the same brush, applied UD's Chopper (Naked 2, metallic rose gold) on the outer third, making a ">" shape.
- Taking a warm light matte brown colour (Too Faced, Chinchilla) with the same brush and applied it right on top of Chopper and blended towards the inner corner, focusing more on the outer V until it was a nice gradient.
- Using Sephora's liquid eyeliner in Dark Brown, lined my upper lash line only on outer 2 thirds verrrrrryy thinly, and extended it about a cm out horizontally. (so no winging it up! just straight out)
- Lastly tight-lined upper lash line using NYX black eye pencil, and curled lashes and applied Benefit's Bad Gal Lash in Black (I curl my lashes before and after I apply mascara!!)
- For my lips, I used Clinique Lip-Shaping Pencil in Raspberry and applied it only within the inner bit of my lip. Then I took the brush I used for my foundation, and with the residue left over, just brushed it on my lips so that it took a tiny bit of my natural lip colour away.
 Tada~ That's the final look, I hope you guys enjoyed ... reading all of that~ hahhaha
Let me know if you guys liked or hated this look down below:)
Bye says Ttalgi~
Labels: Make-up


